Thank you for choosing SnapForms. This guide covers installation, basic usage, regular use features, troubleshooting and support information to get you started quickly.
Requirements
WordPress: 5.6+ (tested up to 6.8.2)
PHP 8.0+ recommended (8.2+ recommended)
MySQL 5.7+ / MariaDB equivalent
Required PHP extensions: json, mbstring, openssl, php-zip, gd and curl
Installation & Activation
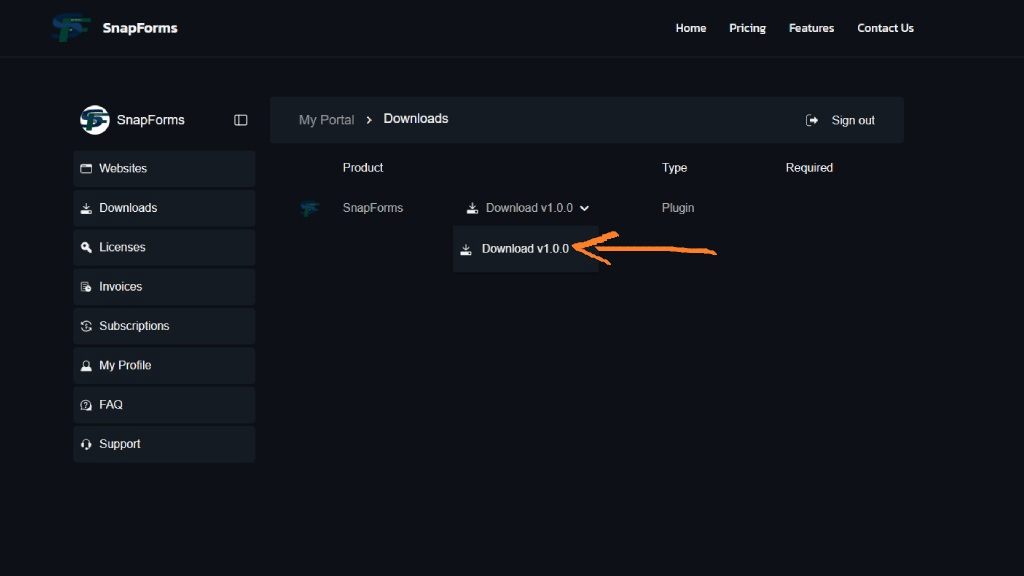
After purchase completion you should receive an email in your inbox with a download link and license key.
Download the ZIP through the provided download link. You may also log into your Customer Portal account using the provided credentials, there you may access the Downloads tab and download SnapForms.

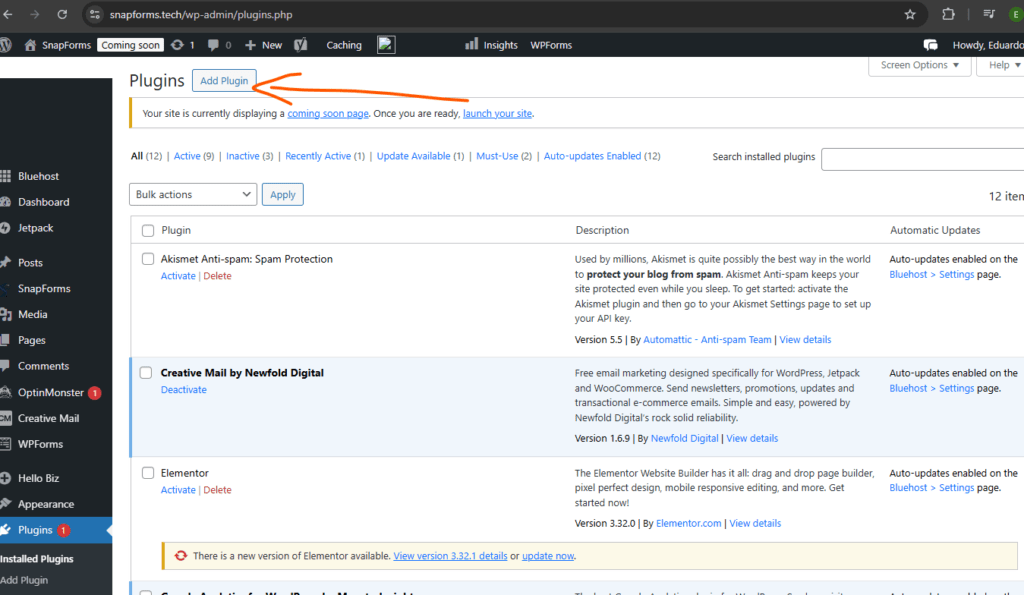
Install via WordPress Admin (recommended)
- Go to Plugins → Add New → Upload Plugin.
- Choose the downloaded SnapForms zip file (the installable plugin zip) and click Install Now.
- After installation click Activate.


Install via FTP (alternative)
- Unzip the downloaded SnapForms zip locally — it should contain a single folder named
snapforms. - Upload the
snapformsfolder to/wp-content/plugins/on your server. - In WordPress admin, go to Plugins and click Activate next to SnapForms.
It should now be listed among your active plugins.
After activation, you can configure the plugin settings and start creating your forms.


On first activation SnapForms will create its database tables and default options (including an encryption key). If you have strict permissions (DB, file writing, …) you may need to allow table creation or file modifications.
If activation fails and WordPress shows a fatal error, first enable debug logging in wp-config.php (see Support section). To forcibly deactivate: rename the plugin folder via FTP.
Basic Setup
The following steps should be taken to configure SnapForms.
Preferably, you should complete these steps before using the plugin, for the best experience.
Encryption
Managing your encryption key
Upon activation, your SnapForms plugin will generate an encryption key. This key is responsible for encrypting the submission sensitive fields data.
You can manage your encryption key from the SnapForms Security Settings page.

Choose the Encryption tab. Here you can view and manage your encryption key.
You can download your current encryption key as a file for backup purposes, or for use on another installation of SnapForms, if you intend to migrate your forms submission data.

You can import an existing encryption key if you have one from a previous installation.

If you lose your encryption key, you will not be able to decrypt previously stored sensitive data. Always keep a backup of your encryption key in a safe place.
Keep your encryption key secure and do not share it with anyone. It is the only way to access your encrypted data.
Form Abuse Prevention
Preventing Form Abuse (Spam Protection)
Form abuse is a serious issue. Automated bots and malicious users may attempt to submit spam, flood your forms, or exploit vulnerabilities. To protect your forms and your site, SnapForms provides several anti-abuse measures:
- reCAPTCHA: Adds a Google reCAPTCHA widget to your forms, blocking most automated submissions and requiring users to prove they are human.
- Honeypot: Inserts a hidden field that only bots will fill out. If this field is completed, the submission is rejected, silently blocking basic spam bots.
- IP Rate Limiting: Restricts the number of submissions allowed from a single IP address within a set time period, preventing brute-force and spam attacks.
Enabling these features greatly reduces spam and abuse, ensuring your forms remain secure and your data stays clean. You can manage this measures from the SnapForms Security Settings page.

Choose the Encryption tab. Here you can view and manage your encryption key.
You can download your current encryption key as a file for backup purposes, or for use on another installation of SnapForms, if you intend to migrate your forms submission data.

Enabling reCAPTCHA requires setting up a site key and secret key from the Google reCAPTCHA admin console.
Google gives a probability score (between 0 and 1) for each interaction, and you can adjust the Score Threshold to control the level of verification required. A lower score means a higher likelihood of the user being a bot.
Email Setup
SMTP Account Configuration
SnapForms allows you to automatically notify users via email when a form is submitted, or there is any change to their submission status. You can also send email notifications without any trigger events.
For this purpose, SnapForms requires an SMTP account to send form submissions via email. This ensures reliable email delivery and helps prevent your messages from being marked as spam.
You can save multiple SMTP accounts and choose which one to apply for each email notification.
1. In the admin menu, click SnapForms → Email Dashboard.
2. Inside the Email Dashboard, click Manage on the SMTP accounts menu.


3. Now in the SMTP Accounts list, click Add SMTP Account or the Edit button, if you want to change the configuration of an existing account.


4. Enter your SMTP server details:
- Name: The alias for your SMTP account (the name of the sender of emails that you want to be shown).
- Email Address: Your email address.
- SMTP Host: The address of your SMTP server (e.g., smtp.example.com).
- Password: Your SMTP password.
- Port: The port used by your SMTP server (e.g., 587 for TLS, 465 for SSL).
- Encryption: Choose your encryption method (TLS or SSL or None).
5. Click Add SMTP Settings to apply your changes.
Form Building & Configuration
The following are the key steps for form building and configuration:
These are usually done in the early stages of a form’s life-cycle.
Folders
Creating a folder
Folder are very important in SnapForms. They are responsible for housing your forms.
1. Click the Add New Folder button from the Main Dashboard, or the Add Folder button from a previous folder in the Main Dashboard.


Alternatively, you can access the tree view (for a more decluttered view), in which you can add a new folder by clicking the Add New Folder button.
2. Set the folder title, parent folder (if empty this will sit at the root), and whether it is active or not.

Click the folder icon to open a tree view and choose a parent folder.
Click Save to finalize the creation of your new folder.
3. Afterwards, you’ll gain access to folder actions, including visiting the folder public page, subfolders list and child forms list.


Forms
Creating a form
1. Access the Forms tab inside a folder.

2. Click Add Form to create a new form. It gives you two options: New Form (from scratch) or Create Form from Template.

3. Select one of the options to proceed.
Template Selection
By choosing a template, you can quickly set up a form with the same settings, fields and even emails (submissions not included).Just set the title, choose the template to apply and the parent folder.


You can access the templates list from the Manage Templates inside the Forms section in the SnapForms dashboard.
Templates are a great way to save time and ensure consistency across your forms. They are created as form duplications that can be reused and customized as needed. After their creation, they’re no longer tied to the original form and can be modified independently.
You’ll have to set the settings for the new form, including the title, description, and any specific options you want to configure.


In the Submission Settings tab, you can control advanced options for your form:
- Allow New Submissions: Enable or disable the ability for users to submit new entries.
- Allow Edit: Allow users to edit their existing submissions.
- Allow Cancel: Allow users to cancel their own submissions.
- Require Login: Restrict form access to logged-in users only.
- Unique Instance: Limit each user to a single submission per form.
Adjust these settings to match your workflow and privacy requirements.
You can always go back and edit your form settings later. However, some changes may affect existing submissions or user experiences, so proceed with caution.
Save the form.
Embedding a form
SnapForms, automatically generates a page for you with the form shortcode. However, you can use the shortcode to add it anywhere:
[snapforms route="public/form/YOUR_FORM_ID"]Replace YOUR_FORM_ID with the ID of your form.
Fields
Fields are the DNA of your forms. They define the kind of data you’ll be able to collect.
Creating a forms field
1. To access the Fields Editor, click the Fields button tab inside a form menu.


2. Do you need to export fields to another form?
Use the Import/Export Fields button in the Fields Editor to download a JSON file of your fields.
You can then import this file into another form to replicate the same fields and settings by dragging and dropping into the upload area.


3. To create a new field, click the Add Field button in the Fields Editor. It will open a modal where you can select the type of field you want to add, among the remaining field details.


Check if a field’s data should be considered sensitive, this may depend on the applicable legislation for your jurisdiction. If so, make sure to mark it as Sensitive Field, that will enable encryption for that field.
This will ensure that the data collected through this field is securely encrypted in the database. Keep in mind that encrypted fields cannot be used for search.
Also check if your field fits the definition of Personally Identifiable Information (PII), as this may have implications for data protection and privacy regulations, such as GDPR.
If so, mark it as Personal Field, making it possible to manage it as personal information.
When a submission is deleted, any personal or sensitive data associated with it will also be permanently removed from the database, and marked as [REDACTED], ensuring compliance with data protection regulations.
4. There are a few different field types you can choose from:

- Email — email validation (inherits the user’s email, if logged in)
- Name — email validation (inherits the user’s name, if logged in)
- Text — single-line input
- Textarea — multi-line input
- Select — dropdown menu
- Image Select — allows users to select an image from a set of images defined in the field settings
- Checkbox — either single checkbox (no values) or multi-select (multiple options can be checked)
- Radio — single selection (only one option can be checked)
- Number — numeric input
- Date — datepicker-enabled
- Time — timepicker-enabled
- Consent Checkbox — requires user consent (no values, editable text – description)
- File Input — user uploads stored in an uploads table
- Image Input — user uploads stored in an uploads table


5. SnapForms supports conditional logic, allowing fields to show/hide based on user input. However, unlike the typical conditional logic found in other form builders, SnapForms’ implementation is designed to allow for multiple coexhisting conditions, or conditions dependant on multiple fields.

Multiple simultaneous conditions for a field are achieved through condition groups. Each group can contain multiple conditions, and all conditions within a group must be met for the group to be satisfied.
There could be multiple condition groups for a single field, allowing for intricate logic and dependencies.
This means you can create complex forms where the visibility of a field can depend on several other fields’ values, providing a more dynamic and tailored user experience.
Field Versions
SnapForms supports multiple versions of fields, allowing you to review previous versions of a field. This is particularly useful for tracking changes, reverting to earlier versions, understanding the evolution of a field’s configuration or even GDPR auditability.
Click Version History to view all versions of this field in the field edition form.


From the versions list, you can see the version number, date created, and author. You can also preview a previous version, by clicking the eye icon.
From the version details, you can see all the field settings at that point in time. If you want to revert to this version, simply click the Save Field button.


Rolling back to a previous version creates a new version with the reverted settings, preserving the version history.
Email Automations
Automated emails are a powerful feature of SnapForms, enabling you to keep users informed and engaged without manual intervention.
By configuring email automations, you can automatically notify users when key events occur, such as registration, approval, cancellation, or rejection of a submission. This ensures timely communication, improves user experience, and helps maintain transparency throughout the process.
Automated emails also reduce administrative workload and minimize the risk of missing important data, making your workflow more efficient and responsive.
In order to use the emails, you need to set up your email automations. Email automations allow you to incorporate dynamic data, such as user information and form responses through wildcards, into your email messages.
Creating an email automation
1. Access the Email Automations list from the a form’s Email Automations tab.
2. Click the Add Email Automation button, to generate a new email template.

3. Fill in the email automation details, including the name, subject, body, and any wildcards you want to use. You only need to drag and drop the wildcards from the wildcards panel into the email body.


To edit the email body, you can use wildcards to insert dynamic data into your email templates. Wildcards are placeholders that will be replaced with actual data when the email is sent.
Keep in mind to select one of the Email Types to ensure the email is sent on the appropriate event.
Email Automation Versions
SnapForms supports multiple versions of Email Automations, allowing you to review previous versions of an email automation. This is particularly useful for tracking changes, reverting to earlier versions, understanding its evolution or even GDPR auditability.
Click Version History to view all versions of this email automation in the email automation edition form.
From the versions list, you can see the version number, date created, and author. You may also preview a previous version, by clicking the eye icon.


From the version details, you can see all the email automation settings at that point in time. If you want to revert to this version, simply click the Save Automation button.


Rolling back to a previous version creates a new version with the reverted settings, preserving the version history.
Form Management & Analysis
The following are the key steps for form management and analysis:
These are usually done in more mature stages of a form’s life-cycle.
Submissions
Submissions are the lifeblood of any form. They are the raw data provided to you by users filling out the form.
Accessing and analyzing this data is crucial for understanding user behavior and improving your forms.
Submission data though very crucial, can cause huge headaches such as data privacy concerns, compliance issues, and the need for robust data management practices.
SnapForms encrypts all the sensitive submission data, protects submission file upload locations, and provides tools for managing data retention and deletion.
Manage Submissions
1. To access the Submissions list, click the Submissions button inside a form menu.


2. From the submissions list, you can view, search, filter, and manage all submissions for that form.
You can also export submissions to an Excel file for further analysis.


3. There are various actions you can perform on each submission. Among them: edition, email logs check, submission approval, submission rejection and submission deletion.

When a submission is deleted, any personal or sensitive data associated with it will also be permanently removed from the database, and marked as [REDACTED], ensuring compliance with data protection regulations.
Any associated email logs will also be anonymized, removing personal and sensitive data while retaining non-personal information for audit purposes.
Any sensitive files associated with the submission will also be permanently deleted from the server.This ensures your compliance with data protection regulations, such as GDPR, and respects user privacy, without requiring additional action on your part.
4. To view the details of a submission, click the edit button (pencil icon) next to the submission you want to view. This will open a new page with all the submission details.


Snapshots
Fields may change over time. However, that should not mean that previous submitted data should be lost or become incomprehensible.
Snapshots are powered by the fields versioning and provide admins with a way to view fields as they were submitted.

Snapshots show up if there’s a mismatch between the field’s current version and the submitted version.
If their alerts are expanded, admin can check the submitted field version, besides the submited value. This may help to diagnose any unwanted changes that may need to be reverted.
Bulk Actions
Sometimes you’ll need to apply the same action to multiple submissions at a time, in order to streamline your workflow.
Bulk actions allow you to perform actions on multiple submissions at once, saving you time and effort.
Select multiple submissions from the list, by marking the checkboxes at the left of each submission row.
Choose an action from the bulk actions dropdown.There currently exist the following bulk actions.

There currently exist the following bulk actions.
- Approve — marks the selected submissions as approved, triggering any associated approval emails.
- Reject — marks the selected submissions as rejected, triggering any associated rejection emails.
- Delete — permanently deletes the selected submissions and any associated personal or sensitive data, email logs, and files.
- Send Email — sends a bulk email to the selected submissions.
Then, click Apply to execute the selected bulk action.
If you choose the Send Email action from the bulk actions dropdown, you can send a bulk email to multiple submissions at once.

This will open a new page where you can write an email you want to use, customize the subject and body, and send the email to all selected submissions.This email will be sent to all selected submissions at once, saving you time and effort.
Keep in mind that the email will be sent as a single message to all selected submissions, so any personalization should be done within the email content itself.
For this purpose, use the wildcards provided below the email body editor. Just drag and drop the wildcards into place.
Email Logs
Email logs provide a detailed record of all email communications sent through SnapForms.
They are essential for tracking email delivery, diagnosing issues, and ensuring effective communication with users.
Access Email Logs
You can acces the email logs through the Email Dashboard (Main Dashboard → Email Dashboard), then either click View All Logs, (for the full logs paginated list) and click the view button (eye icon).


Or, you can access the email logs of a specific submission directly from the submission details page through the Email History button, or directly from the submissions list by clicking the Email Logs button (envelope icon).


After choosing one of the email logs through the view buton (eye icon), you’ll access the Email Log with all its details.
Then, you can check all the details of the email, including the recipient, subject, body, and its status.
Analytics
Analytics provide insights into form performance and user behavior.
By analyzing form submissions, you can identify trends, optimize form design, and improve user experience.
SnapForms includes an analytics dashboard that provides visualizations and metrics to help you better understand your forms data.
Access Analytics Dashboard
1. You may access the analytics dashboard from inside any form menu, or submissions list through the Analytics button,

2. Inside the analytics dashboard, you can view various metrics related to your form submissions by field or other factors such as country, device type and primary language.


You may filter the analytics by field, as in the submissions list.
You can also export the analytics data to a spreasheet for further analysis.
Support
For requesting support, please:
- Open a support request through the Contact Us tab within the SnapForms plugin, through our Customer Portal, or contact us through email to [email protected].
- Please, provide steps to reproduce the problem and screenshots where relevant.
- It may be needed for you to provide a WordPress Admin access and/or an FTP account with access to your WordPress installation.
Please, instead of providing your own credentials, create a new WordPress Admin User and/or FTP account that can be disabled after the support ticket is closed. - We may need to use the provided access to export your SnapForms error logs (SnapForms admin dashboard → Error Logs → Export Logs) and your
/wp-content/debug.logto trace any potential errors.
How to obtain the debug.log?
WordPress creates a debug log when debug mode is enabled. To enable WordPress debug logging, edit wp-config.php:
define(‘WP_DEBUG’, true); define(‘WP_DEBUG_LOG’, true); define(‘WP_DEBUG_DISPLAY’, false); //keep errors hidden in production @ini_set(‘display_errors’, 0);
Most Common Issues
File upload fails
Check php.ini for upload_max_filesize and post_max_size to ensure they are large enough for the uploaded files.
Ensure the gd extension is available for image processing.
Database Query timeout or buffer errors
Check your database server settings and logs for any indications of timeout or buffer issues. You may need to increase the server’s resources.
Uninstall
To just uninstall:
- Deactivate the plugin from Plugins screen.
To also remove the plugin data:
Remove the files from the /wp-content/snapforms/ directory. This folder contains a configs folder (which contains your plugin’s encryption key and security configurations) and a uploads folder with uploaded files.
Warning: this permanently deletes all uploaded files and your encryption key, rendering any existing sensitive submission data unusable.
Remove the MySQL tables manually via phpMyAdmin.
Warning: this permanently deletes stored forms and submissions.
License
SnapForms is licensed under the GNU General Public License v2 or later versions, SnapForms contains a LICENSE.txt for further information.
You are free to modify and use SnapForms in accordance with the GPL. However, access to automatic updates, premium features, and official support is reserved for licensed users.
The use of a valid license key is required to enable update and support services.
Redistribution of official SnapForms builds or claiming authorship of derivative works is prohibited.
SnapForms add-ons and integrations may be distributed under separate proprietary End User License Agreements (EULAs).